
Page 14 - 2026 HuFriedyGroup Digital Catalog
P. 14
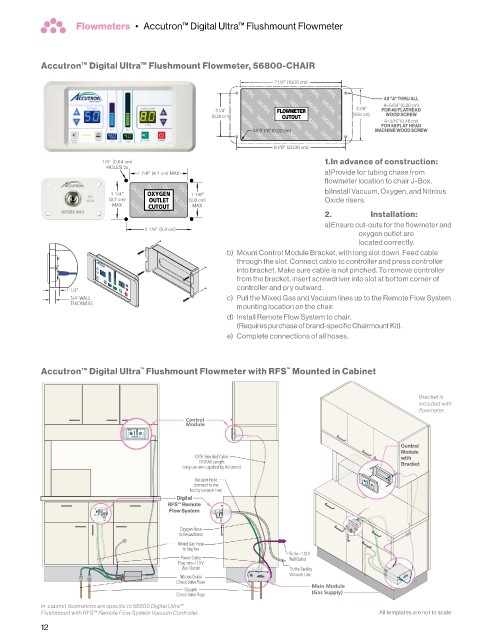
Accutron™ Digital Ultra™ Flushmount Flowmeter, 56800-CHAIR

                                                                     7 1/2"  (19,05 cm)

                                                                                                4X "A" THRU ALL
                                                                                                A=5/64" (0,20 cm)
                                                      3 1/4"          FLOWMETER          3 7/8"  FOR #8 FLATHEAD
                                                      (8,26 cm)        CUTOUT           (9,84 cm)  WOOD SCREW
                                                                                                A=3/16" (0,48 cm)
                                                                                               FOR #8 FLAT HEAD
                                                                4X R 1/8" (0,32 cm)           MACHINE WOOD SCREW
                                                                     8 1/8"  (20,96 cm)
                                                                                 1  In advance of construction:
                                                                                 a) Provide for tubing chase from
                                                                                 flowmeter location to chair J-Box .
                                                                                 b) Install Vacuum, Oxygen, and Nitrous
                                                                                 Oxide risers .
                                                                                 2                    Installation:

                                                                                 a) Ensure cut-outs for the flowmeter and
                                                                                          oxygen outlet are
                                                                                          located correctly .
                                                         b)   Mount Control Module Bracket, with long slot down . Feed cable
                                                            through the slot . Connect cable to controller and press controller
                                                            into bracket . Make sure cable is not pinched . To remove controller
                                                            from the bracket, insert screwdriver into slot at bottom corner of
                                                            controller and pry outward .
                                                         c)   Pull the Mixed Gas and Vacuum lines up to the Remote Flow System
                                                            mounting location on the chair .
                                                         d)   Install Remote Flow System to chair .
                                                            (Requires purchase of brand-specific Chairmount Kit) .
                                                         e)  Complete connections of all hoses .


           Accutron™ Digital Ultra  Flushmount Flowmeter with RFS  Mounted in Cabinet
                                    ™
                                                                        ™
                                                                                                         Bracket is
                                                                                                         included with
                                                                                                         flowmeter.

                                         (9.16" (23.27 cm) L x 4.26" (10.82 cm) H)
                                                                                                    Control
                                                                                                    Module
                                                                                                    with
                                                                                                    Bracket


                                             Digital
                                           RFS™ Remote
                                           Flow System
                           25 20 15 10 5 in Hg
                          30
                           VACUUM


                                              Nitrous Oxide
                                             Check Valve Riser
                                               Oxygen
                                             Check Valve Riser
           In-cabinet illustrations are specific to 56800 Digital Ultra™
           Flushmount with RFS™ Remote Flow System Vacuum Controller.                          All templates are not to scale .
           12